一.PHP跳转页面
1.cookie和session的区别
Cookie数据存储在本地,session在服务器下发cookie
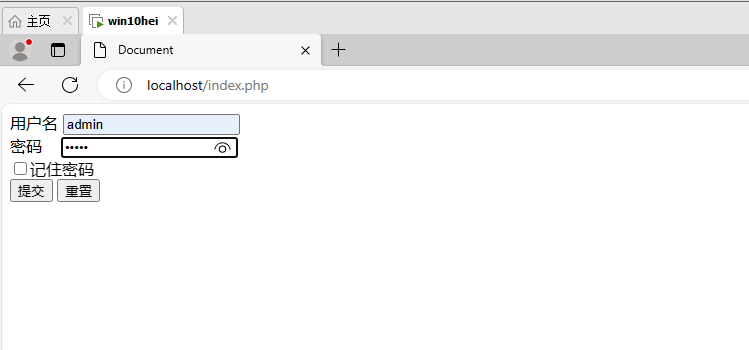
2.首先,创建并编写index.php , link.php, zhuye.php三个文件并用vscode打开。先编写index.php文件,用from表单写一个简单的登录页面。代码如下:
1
2
3
4
5
6
7
8
9
10
11
12
13
14
15
16
17
18
19
20
21
22
23
24
25
26
| <!DOCTYPE html>
<?php header('Content-Type: text/html; charset=utf-8');?>
<html lang="en">
<head>
<meta charset="UTF-8">
<meta name="viewport" content="width=device-width, initial-scale=1.0">
<title>汗流浃背了</title>
</head>
<body>
<form method="post" action="link.php">
<tr>
<td>用户名</td>
<td><input type="text" name="username" ></td></tr><br>
<tr>
<td>密码   </td>
<td><input type="password" name="password" ></td></tr><br>
<tr>
<td><input type="checkbox"name="remeber" value="yes" >记住密码</td><br>
<td><input type="submit" name="submit" value="提交" ></td>
<td><input type="reset" value="重置" ></td>
</tr>
</body>
</html>
|
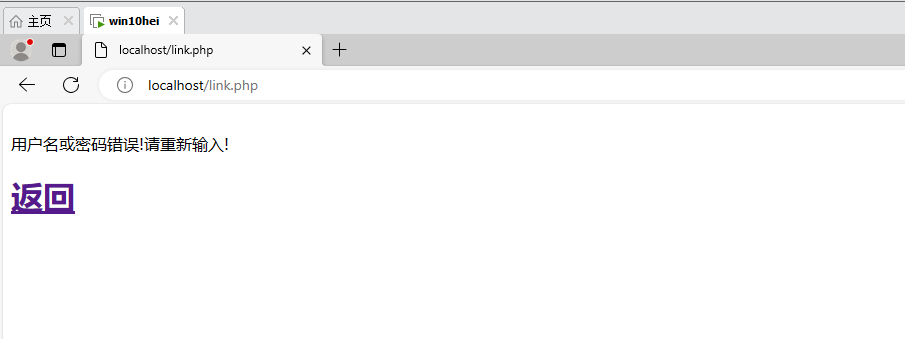
3.再编写link.php,用于连接数据库。用session存储index.php传递过来的用户名和密码
然后在数据库中查询是否存在该用户名和密码。
1
2
3
4
5
6
7
8
9
10
11
12
13
14
15
16
17
18
19
20
21
22
23
24
25
| <?php
header('content-type: text/html; charset=utf-8');
session_start();
if(isset($_POST['submit'])){
$u = trim($_POST['username']);
$p = trim($_POST['password']);
$link=mysqli_connect("127.0.0.1","root","root","security")or exit("Error connecting");
mysqli_query($link,"set names utf8");
$sql= "select * from users where username='$u' and password='$p'";
$result=mysqli_query($link, $sql) ;
if(mysqli_num_rows($result)>=1){
$_SESSION['user']=$u;
setcookie('password',$p,time()+7*12*60*60);
header('Location:zhuye.php');
exit();
}else{
echo "<br>";
echo '用户名或密码错误!请重新输入!';
//sleep(3);
echo '<h1><a href="./index.php">返回</a></h1>';
}
}
?>
|
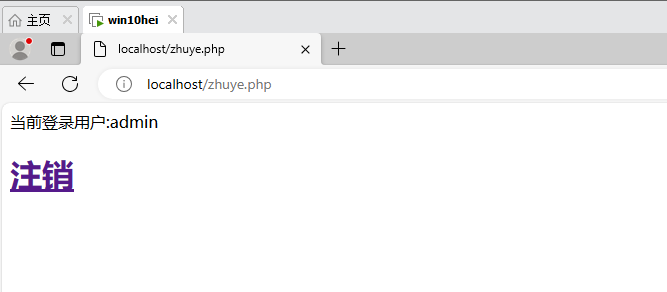
4.编写 zhuye.php,传递数据库对应的用户名并显示。然后实现用户注销的功能。
1
2
3
4
5
6
7
8
9
10
11
12
13
14
15
16
17
18
19
20
21
22
23
24
25
26
27
| <?php
session_start();
header('Content-Type: text/html; charset=utf-8');
if(isset($_SESSION['user'])){
echo '当前登录用户:'.$_SESSION['user'].'';
if (isset($_GET['logout'])) {
// 清除会话数据
session_unset();
session_destroy();
echo "您已成功注销。<br>";
header('Location:index.php');
}
echo '<h1><a href="?logout=true">注销</a></h1>';
}else{
echo '错误!';
header('Location:index.php');
}
?>
|
二.PHP写评论区和文件上传框
1.创建并编写comment.php,先用from表单的textarea写一个评论区。右击虚拟机的navicat.exe的之前创的数据库security,新建数据表security,把用户输入的评论插入到security数据库的数据表comments。

1
2
3
4
5
6
7
8
9
10
11
12
13
14
15
16
17
18
19
20
21
22
23
24
25
26
27
28
29
30
31
32
33
34
35
36
37
38
39
40
41
42
43
44
45
46
47
48
49
50
51
52
53
54
55
56
57
58
59
60
| <!DOCTYPE html>
<html lang="en">
<head>
<meta charset="UTF-8">
<meta name="viewport" content="width=device-width, initial-scale=1.0">
<title>Document</title>
<style>
.ab {
color:blue;
}
</style>
</head>
<body>
<form method="post" action="">
<label for="comment">发表评论</label>
<textarea name="comment" id="comment" rows="10" cols="80"></textarea>
<input type="submit" name="submit" value="提交评论">
</form>
<h1 class="ab">历史评论</h1>
<?php
if ($_SERVER['REQUEST_METHOD'] == 'POST') {
if (isset($_POST['comment']) && !empty($_POST['comment'])) {
$comment = $_POST['comment'];
$link = mysqli_connect("localhost", "root", "root", "security") or exit("数据库连接失败!");
mysqli_query($link, "set names utf8");
$ChaRu = "insert INTO comments (comment) VALUES('$comment')";
if (mysqli_query($link, $ChaRu)) {
echo "<p>你的评论已成功保存到数据库。</p>";
} else {
echo "<p style='color: red;'>保存评论时出错。</p>";
}
mysqli_close($link);
}
}
// 显示最近的20条评论
$link = mysqli_connect("localhost", "root", "root", "security") or exit("数据库连接失败!");
mysqli_query($link, "set names utf8");
$query = "SELECT * FROM comments ORDER BY id DESC LIMIT 20";
$result = mysqli_query($link, $query);
if ($result) {
echo "<h2>最近的评论</h2>";
while ($row = mysqli_fetch_assoc($result)) {
echo "<p>{$row['comment']}</p>";
}
} else {
echo "<p style='color: red;'>获取评论时出错。</p>";
}
mysqli_close($link);
?>
</body>
</html>
|
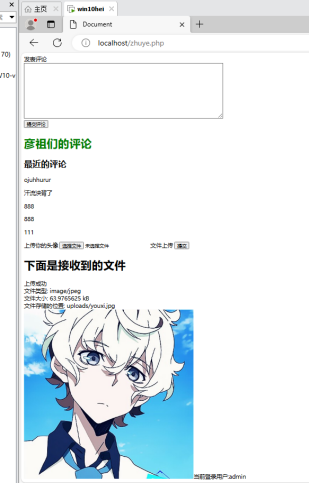
2.创建并编写upload.php,再创建upload文件夹,存储用户上传的文件,把index.php, link.php, zhuye.php,comment.php,upload文件夹复制到phpstudy的根目录下,启动apache和mysql,打开网站,登录,输入评论,上传头像。
1
2
3
4
5
6
7
8
9
10
11
12
13
14
15
16
17
18
19
20
21
22
23
24
25
26
27
28
29
30
31
32
33
34
35
36
37
| <?php
echo '
<form action="" method="post" enctype="multipart/form-data">
<label for="upload">上传你的头像</label>
<input name="file" id="upload" type="file" >
<label for="submit" >文件上传</label>
<input name="submit" id="submit" type="submit">
<h1>下面是接收到的文件</h1>
</form>
';
header('Content-Type: text/html; charset=utf-8');
if(isset($_FILES["file"])){
$upload_dir = "uploads";
$file_name = $_FILES["file"]["name"];
$file_type = $_FILES["file"]["type"];
$file_size = $_FILES["file"]["size"];
$file_tmp = $_FILES["file"]["tmp_name"];
$target_path = $upload_dir.'/'.$file_name;
if (move_uploaded_file($file_tmp, $target_path)){
echo "上传成功"."<br>";
echo "文件类型: " . $file_type . "<br>";
echo "文件大小: " . ($file_size / 1024) . " kB<br>";
echo "文件存储的位置: " . $target_path;
}else{
echo "上传失败"."<br>";
}
echo "<br/>";
echo "<img src='./$target_path.'>";
}
?>
|